Cranberry Meatballs

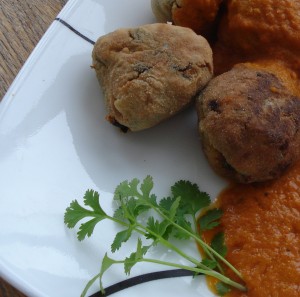
My adventures in ground meat cookery continue with a foray into appetizer meatballs. The versatility of meatball recipes keeps me intrigued; recipes can so easily be tweaked with different sizes, meats or flavors to fit the occasion.

Last evening, I hosted a small birthday soiree for Sabrina and decided to take a meatball recipe I had tried as a meal a few weeks before and turn it into an hors d’oeuvre simply by rolling smaller meatballs and keeping a ready supply of toothpicks. I also made it Sabrina-friendly by using ground turkey instead of beef.

SARAH’S CRANBERRY MEATBALLS

Cranberry Meatballs2 lbs of ground meat (turkey, beef, pork, etc.)
1 large egg
3/4 cup plain breadcrumbs
1/8 to 1/4 cup chopped fresh parsley
1/4 cup diced onions
1/8 cup ketchup
1 teaspoon Worcestershire sauce
1 teaspoon prepared horseradish
1/2 teaspoon minced garlic
1 (16oz) can cranberry sauce
1 (12oz) bottle of chili sauce (think Heinz, not sriracha)
2 teaspoons brown sugar

Combine all ingredients up to and including the garlic. They can simply be mixed with a spoon, or you can run them through a food processor for a finer texture of meat.

Roll smaller balls for appetizer or larger for a meal. Arrange on a non-stick baking sheet and bake at 375 for at least 20 minutes (longer for larger balls).

Meanwhile, combine the cranberry and chili sauces with the brown sugar in a large saucepan. You can add a bit of water and/or use an immersion blender or electric beaters to smooth out the sauce. Heat the sauce and add the meatballs after baking. Once heated through, they are ready to serve. Supply toothpicks for your appetizer meatballs or serve over rice for a meal.

Links to other items on the menu: hummus, seafood deviled eggs, mango curry deviled eggs and Swiss fondue.


Wasabi Deviled Eggs

It’s getting to be that time of year, again, when I get in the mood to make deviled eggs. My friends and family find it a bit nutty that I get into the mood for deviled eggs when the weather warms up, but out of the mood for deviled eggs when winter comes. Go figure? Perhaps it’s the close connection of deviled eggs with cook-outs, perhaps it’s the fact that deviled eggs are served chilled, but either way, it strikes me as deviled egg season once more!

For the first deviled eggs batch of the season, I revisited a recipe I had tried a few times last year and had never been quite satisfied with. After making a few batches of wasabi eggs last summer, I found myself with a peculiar conundrum.

My wasabi deviled eggs never turned out green.

Most of the time, I care little for aesthetics as long as the food turns out tasting good. And yet, it just somehow seemed wrong and dis-satisfactory for a wasabi deviled egg to be anything but green. This time around I was bound and determined to create a green egg.

Wasabi EggsSARAH’S WASABI DEVILED EGGS

6 hard-boiled eggs
1 tablespoons mayonnaise
1/2 (5oz) can of tuna or salmon, drained
1 1/2 tablespoons wasabi powder
a dash of soy sauce
2 teaspoons dijon mustard
a few dashes toasted sesame seeds
1-2 teaspoons chopped green chilis
1/2 teaspoon ground ginger
1/2 teaspoon minced garlic
1 teaspoon lime juice
1 green onion, chopped
zest of one lime
1-2 tablespoons cilantro chutney and/or fresh cilantro

Halve the eggs and remove the yolks. Combine the yolks and remaining ingredients in a small bowl with egg beaters until smooth. Spoon into egg white halves, chill and serve.

Fundamentally, my strategy here was to put everything green I could think of into this recipe in order to make it green. It turned out relatively green in the end, though the wasabi flavor was a little less prominent than in earlier versions. Not a terrible thing, since much of the stuff I added is pretty tasty and complementary to the ingredients of the previous recipe.

Chicken Cacciatore

I make this recipe all the time, and decided I should finally blog it, since it’s tasty and works every time. What I find interesting about the recipe is how the ingredients are very simple, but getting it right involves patience and technique. Strictly speaking, I don’t think I use all of the traditional cacciatore ingredients; but another nice thing about the recipe is that it’s very forgiving about the vegetables you can use, which I always think is a plus, and anyway, fuck tradition or whatever. I present it to you with the vegetables I like to use the most. Oh, and another nice thing about the recipe is that it’s a one-pot meal - well, two pots, since you’ll want to be making rice or pasta simultaneously. But still. The following makes enough for my husband and I for dinner, and enough leftovers for at least one of us to have lunch the next day.

Chicken thighs, frying away.


You’ll need:

4 chicken thighs
Oil
All-purpose flour
1/2 large white onion, diced
4 cloves garlic, crushed
2/3 cup white wine
1 red bell pepper, chopped
1 bunch red kale, destemmed and torn into small pieces
1 small BPA-free can of diced tomatoes (I use Muir Glen Organic), or 4 fresh roma tomatoes if they’re in season, diced
1/2 - 1 teaspoon black pepper
1/2 teaspoon sea salt (or 1/4 teaspoon regular old salt)
1/2 - 1 teaspoon dried oregano
Brown rice or pasta


Get a heavy-bottomed lidded pot or deep skillet. I have Le Creuset Dutch oven that’s coated cast iron and it is worth every single cent of the $150 it cost and more - I use it constantly. But the point is, you’ll need a good heavy pot or deep skillet with a lid. Heat it over medium heat, and add enough oil to coat the entire bottom. Olive oil adds a nice flavor to the chicken, but canola can be heated to a higher frying temperature, so a mix of both is ideal, but failing that, if you use olive oil keep the heat at medium, but if you use canola you can go to medium high.

CAN YOU SPOT THE DORITO BAG?

Coat your chicken thighs in flour, and then fry them gently until they’re golden brown; it takes about 5 - 7 minutes per side. Set them aside on paper towels. Pour most of the oil out of the pan, but leave a little.

Dice half a large white onion and crush four garlic cloves and add them to the oil, turning down the heat to medium low. Sautee until golden brown, about 10 minutes. When everything’s starting to carmelize (don’t burn the garlic!) deglaze with the white wine. Bring the wine to a simmer. Drink the remainder of the open bottle of wine - remember, NEVER cook with a wine you wouldn’t drink.

Add the can of tomatoes* and juice. Chop the red bell pepper and add that along with the pepper, salt, and oregano. Stir and bring to a simmer. De-stem and chop your red kale into bite-sized pieces (you can do this while the chicken is frying) and put that into the pot - cover it and allow the leaves to wilt, about five minutes.

Nestle nestle.

Give everything a good stir, and then nestle your chicken thighs back into the mix. Turn the heat to low+ - somewhere between low and medium low - and cover the pot or skillet most of the way, but make sure steam can escape. Braise the kale and chicken thighs this way for 45 minutes.

Traditionally cacciatore is served with pasta, and that’s perfectly tasty, but I personally like to serve it with brown rice because I think that the rice soaks up the sauce better. My husband insists that this recipe should also be served with grated parmesan cheese - I might put a few red pepper flakes on the table as well.

Look at all that glistening health!

*If Muir Glen Organic seems pricey (though they’re not so bad, maybe $0.25 more than store-brand for just the small tomatoes), Hunt’s also offers BPA-free can linings, I hear. Because it’s better not to get cancer, you know? Oh, and FYI, Muir Glen’s canned tomatoes are BPA-free, but their other canned goods aren’t, so don’t like, assume the beans are non-carcinogenic just ’cause the tomatoes are. Of course, @javelinwarrior shamed me about canned beans so often that I bought some damned dried beans, so the point’s moot in my house now.


Speaking of @javelinwarrior, I submitted this recipe to his made-from-scratch noms blog:

 JWsMadeWLuvMondays

Easy Samosas

I am always looking for ways to turn any ol’ recipe into an easier version of itself, so when I find myself confronted with a recipe that claims, in and of itself, to be easy, I’m all for it…

Well, not quite, I lied. The unfortunate fact is that most recipes online touting themselves as “Easy” do so because they incorporate a number of canned and processed products chalk full of MSG. If I see onion soup mix on an ingredient list, I close the browser tab and move on.

But I came across a recipe for Easy Samosas and the only pre-packaged ingredient was crescent rolls for the dough. As I have previously discussed, my relationship with fresh made bread and pastry is tenuous at best, and so refrigerated Pilsbury dough is one of the few packaged items I’m happy to use.

Easy SamosaSARAH’S EASY SAMOSAS

1 tablespoon olive oil
1 small onion, chopped
4 garlic cloves, minced
1 (1 lb) package of frozen mixed vegetables (i.e. peas, corn, carrots, green beans, etc.)
5 teaspoons soy sauce
1 teaspoon curry powder
1/2 teaspoon cumin
1 teaspoon cilantro chutney or chopped fresh
1 teaspoon ground ginger
1/4 teaspoon turmeric
1/4 teaspoon salt
1 dash red pepper
1 tablespoon water
2 (8 ounce) packages jumbo biscuits

Saute onion and garlic in the oil. Add mixed vegetables, seasonings and water. Simmer until cooked through.

Roll out the biscuits one by one on a floured surface. Fill each with the vegetable filling, leaving enough room around the edge to wet the dough, fold it over and crimp the edges together with the tines of a fork. Bake at 375 for at least 10 minutes; check and bake longer if the dough is not yet golden brown. Serve with your favorite chutneys.
 

I was really quite pleased with the vegetable filling in this recipe. I did very few alterations (i.e. substituting cilantro chutney for dried, adding more ginger than the paltry 1/4 teaspoon called for), and the filling turned out amazingly tasty, and pretty much exactly as I remember samosas tasting the last time I had them on an Indian buffet.

The dough, of course, wasn’t quite as authentic tasting. I tried both flaky biscuits and buttermilk biscuits. Both were serviceable, but I recommend flaky biscuits if you have the choice. Of course, the original recipe called for crescent sheets, so those could also be substituted, but I opted for biscuits due to the fact that they don’t need to be cut from a sheet and are ready for rolling right out of the container. Other recipes I found called for other types of pre-made pastry sheets, such as phyllo or puff pastry, so certainly those could be used instead. If I’m feeling ambitious someday, I might try making samosas with this filling and the dough from the pita recipe I tried recently.

The original recipe also included a dipping sauce, which I made but found unimpressive. I preferred using the cilantro, tamarind and mango chutneys I had on hand.

The Dastardly Ways of Noodles and Bread

Sometimes the simplest of foods can be the biggest headache in the kitchen. Such has been my experience with the from-scratch making of both noodles and breads; the lure of personal cookery collides with the demands of convenience in my kitchen, and often the result is that I rely on store-bought versions of these simple foods.

And yet, from time to time, the temptation to make these items from scratch reemerges. About a year ago, I got the idea in my head that I could save money by making my own bread for fondue. It’s bread, right? What could be so hard? Several hopelessly dense loaves later, I gave up on ever mastering the fluffy loaf. The more research I did, the more I realized how time- and planning-intensive it was to make a truly edible loaf of bread, and after so many failed attempts I didn’t want to invest in the often specialized ingredients for mastering this art. It wasn’t going to be cheaper if I had to invest in special bread flour or semolina. Convenience won out, and it was back to the Shop N’ Save bakery for their Italian loaf.

Egg NoodlesMy past forays into making noodles and pasta have yielded much more successful results. My dear friend, scholar and renaissance woman, Lisa Di, first introduced me to the wonders of fresh pasta (and bought me a pasta maker for my birthday). After garnering much of her wisdom for pasta fabrication, I produced many delicious and successful batches of fresh pasta; unfortunately, every inch of my kitchen was left covered in a thin film of flour. The ordeal of making the noodles and cleaning up after led me to the conclusion that most of the time, Barilla will serve.

While fresh, or at least refrigerated, pasta is readily available at most larger grocery stores, the item I do have trouble coming by is a good Asian noodle. Most regular grocery stores just don’t have a good selection of Asian noodles, and I don’t relish making a special trip down to the Strip District every time I want to make a noodle dish. For convenience, many of the Asian noodle recipes I find online simply call for pasta, instead of any particular type of noodle, but I’ve tried this and it just tastes wrong. Most store-bought Italian pastas are flour/water based noodles, giving them a lighter flavor and consistency. I’ve made fresh pasta in this way a number of times, simply adding water to flour, and it produced a noodle worthy of your best pesto or carbonara! But try putting it in your lo mein or peanut sauce, and it just tastes all wrong to me. Where can a gal get a nice squiggly egg noodle for her Asian cookery?

Of course, there are all manner of Asian noodles, and matching them up to any particular dish is an art unto itself. But, the other day, I just so happened to be looking up recipes, trying to decide what to make for my so-resolved weekly recipe experiments, when my co-worker ordered some lo mein from the local take place. Why couldn’t I make a noodle like that on my own? I knew I could, but did I want to go to all the trouble?

I resolved, at least, to search for recipes, and I found one that looked do-able, in large part because of its small scope. One major thing I find troubling about making noodles and bread is that most recipes I find for either one are enormous! I understand, in theory, that if you’re going to go to the trouble, might as well make a huge amount at one time and stock up. In reality, tackling the big to-do of an enormous noodle recipe makes me all the less likely to do it. If I have a smaller recipe that I can just mix up, roll out, and cut up-voila noodles!-I’m going to be much more likely to make it on a lazy Saturday afternoon.

Here’s what I found:

DOUGH FOR EGG NOODLES

2 cups flour
2 large eggs
1/2 teaspoon salt
3 tablespoons water

Combine flour and eggs in a large food processor until combined in a mealy consistency. Add salt as it processes, then add the water. Dough should form into a ball that cleans the sides of the food processor bowl.

So… my noodle dough didn’t exactly do this. Noodle and pasta dough is stiff, and while it looked like it was starting to form a ball, it also sounded like it was a threat to break my food processor, so I decided to take one for the team and do a little hand-kneading (even though the recipe touted itself as no-knead). Kneading on a board required more flour, of course, and as I set to rolling out the dough, I realized that I was actually doing myself no favors neglecting my pasta maker. Once I went to the trouble of unearthing my pasta maker from storage, it was actually rather fun to use, and since I made a small amount of dough, the rolling went quickly.

The core device of any pasta maker is the flat roller, two steel rollers that can be set at decreasing amounts of thickness. This roller itself can be used to make deliciously thin lasagna noodles, or to prime a sheet of dough to be sent through a specialized roller. My pasta maker came with a fettuccine roller and a linguine roller. I wanted my noodles to be relatively thick, but I didn’t necessarily want them as wide as fettuccine. Then again, I feared the linguine roller would be too narrow. I rolled the noodle dough to a thickness of 4, and then put half through each roller.

All told, the noodles turned out relatively well. Neither the fettuccine eggs noodles, nor the linguine turned out to be precisely the size and shape I was looking for, but they were tasty. They certainly didn’t taste like spaghetti noodles, but I would have liked an egg-ier flavor, so next time I might try using three eggs instead of two.

Onto the bread…

I also resolved this weekend that I would make another attempt at baking bread. I’m not going to attempt loaf baking anytime soon, but I felt that flat-bread should, at least, be within my realm of possible skills. Flat-breads frequently come in handy for me, as I make a lot of curry and hummus. I have had success with making flat-breads in the past; I have come up with some reasonable naan substitutes, but I shy away from making them because the recipe is such a big ordeal, what with the rising and the kneading and grilling… sigh.

Pita Flat BreadsWhat I needed was a small, no-frills recipe that I could make with couple hours head start for letting the dough rise, and would require only a simple, quick baking. I combed through a number of flatbread recipes online and found one for Greek gyro pitas (i.e. pitas without a pocket). The recipe seemed promising, as it called for simple ingredients I was in the habit of keeping around the house. Unfortunately it was a little big, but the website had a recipe adjustment feature, so I tried cutting it in half and got good results (sometimes these software features result in peculiar amounts for which no one has a measuring device, such as “5/8 tablespoon”).

Here is the recipe I used. I’m going to give both the original amount, and the halved amount:

POCKETLESS PITA FLAT BREADS

Full Recipe                    Half Recipe
1 envelope dry yeast         1/2 envelope dry yeast
2 teaspoons salt                   1 teaspoon salt
1 tablespoon sugar                  1/2 tablespoon sugar
4 cups all-purpose flour         2 cups all-purpose flour
1 1/2 cups warm water         3/4 cup warm water
1 tablespoon olive oil         1/2 tablespoon olive oil

Dissolve the sugar and the yeast in 1/2 cup (1/4 cup for half) warm water. Dissolve the salt in the remaining warm water. Let them stand for about 10 minutes.

Put the flour in the bowl of a large food processor. While processing, add both liquid mixtures. Process until the dough begins to form a ball. Add the olive oil and continue to process until worked through and dough forms a cohesive ball.

Remove dough and place in an oiled bowl, cover with a towel and allow to rise for a couple hours until roughly doubled in size.

Roll out portions of dough (depending on how large a pita you want) to 1/4 inch thickness. Preheat oven to 375. Bake pita on a non-stick baking sheet on a lower rack for 2-3 minutes each side. Pitas remain white and should not get browned. Wrap in dry towels while cooling. Store in plastic to keep them soft.

These pitas were probably the biggest success of all the recipes I tried on Saturday (and I tried at least four new ones). This bread came out soft, fluffy and delicious. It was excellent with a little of my leftover hummus, it was delicious with my Kofta Curry Sauce (new kofta recipe forthcoming); in fact, this bread was so tasty when fresh baked that I found myself limiting the amount of sauce I sopped up with it, just so that more of the flavor of the bread would shine through!

I have yet to see how the bread holds up to storage; I froze the leftover to have at a later time. But even if this bread is at its pique when fresh, the half recipe is so easy that I can have fresh flatbread at will!

Arwz x DressHead Chiffon Patterned Sundress

Arwz x DressHead Chiffon Patterned Sundress / Black with White Accents / Lace Details

The 1970s inspired look has been brought up to date with the help of spaghetti straps, lace, and a frisky length. This black chiffon dress inspired by arwz x www.dresshead.com/c/chiffon-dresses is accented with white floral-like designs on most of the bodice and skirt. At the bottom of the skirt, which falls to just below the mid-thigh level, the pattern changes into a more intricate and complicated landscape to add visual appeal and interest. Thin, black, adjustable spaghetti straps hold the chiffondress to just below shoulder blade level to add to the dresses flirtatious appeal. On the bodice, black lace details provide further contrast to the 1970s inspired prints, bringing an air of romance to an otherwise puckish look. Pair with flat black strappy sandals and a large black leather bag. This dress comes in UK sizes 6, 8, 10, 12, 14, 15, and 18.

Curry Sauce Victory, plus Spinach Kofta

A few weeks ago I took my first foray into Kofta (i.e. Meatball) Curry. The meatballs I made turned out quite pleasing, but the curry sauce recipe I made to accompany them was disappointing. Somehow a recipe that looked to contain all manner of interesting flavors ended up underwhelming and bland.

I resolved to have another go at Kofta Curry, in particular the curry sauce. I contemplated what might have gone wrong in the sauce recipe I used last time, and how it might be fixed. I considered what makes other, similar tomato-based curries (such Tikka Masala or Makhani) that I know and love so tasty. I resolved to pool several curry recipes, including my Tikka Masala and Makhani recipes and a number of Kofta Curry recipes I found online, comparing and contrasting them, taking the common ingredients, adopting uncommon ingredients with special promise, and getting rid of ingredients or methods that appeared troublesome… all with the hope that the resulting recipe would embody all of the glorious flavor one could ever hope for in a Kofta Curry!

Well, at least I wanted it to be tastier than the recipe I tried two weeks ago. And in that goal, at least, I succeeded. While I don’t claim it is the pinnacle of all curry on Earth, it turns out to be a pretty darned good tomato curry with its own character, similar in some ways, but also distinct from the other types of curry recipes I consulted.

SARAH’S DEFINITIVE KOFTA CURRY SAUCE

Kofta Curry Sauce1 oz butter
1 onion, peeled and chopped
2 cloves garlic (1 teaspoon minced)
1 tablespoon ground ginger
1-2 tablespoons lemon juice
1 teaspoon ground red pepper or paprika
1/2 teaspoon turmeric
1 teaspoon garam masala
1 teaspoon ground coriander
1/2 teaspoon cumin
1/2 teaspoon cinnamon
1/2 teaspoon poppy seeds
1 can diced tomatoes
1 (6oz) can tomato paste
water, as needed
1/2 to 1 cup cream or beaten yogurt
cashews
cilantro

Saute the onion and garlic in the butter. Add spices and other ingredients as they simmer. After adding the tomatoes, a little water may be needed if the sauce is too thick. Depending on how long you simmer the sauce (i.e. if you’re going to use it to stew meat, or just keep it warm on the stove while cooking other things), you may need to add a little water as it cooks to keep it at that desired gravy-like consistency.

I’m a fan of smooth sauces, so I used my immersion blender to process this sauce; however if you prefer a chunkier sauce there is really no need to process it, as there are no whole spices in this recipe. Add the cream shortly before serving, and heat through. Serve with kofta meatballs or vegetable balls. Garnish with cashews and fresh cilantro.

The only adjustment I made to this recipe after trying it was that I added an option for less lemon juice. I used the full 2 tablespoons when I made this recipe; when I ate the sauce a second time as leftovers, I noticed it was just a tad acidic after sitting a day in the fridge. Probably adding additional cream would help to tame this acidity, but I may use only one tablespoon of lemon juice in the future.

One day soon, I hope to try this sauce with my previous Kofta Meatball recipe, but in the interest of keeping my repertoire varied, but this past weekend I decided to try a recipe for Spinach Kofta.

I spoke in my afore-referenced blog about different varieties of kofta. Among the Malai (i.e. vegetable) koftas, there seems to be quite a lot of variation from one recipe to another in terms of what vegetables are used. Sometimes the variance is minor, sometimes two recipes will use different vegetables altogether.

I decided to start with a recipe for spinach kofta, as it looked easy enough to make with things I already had around the house. As the recipe called for mashed potatoes, rather than chopped potatoes, I knew I could use my favorite potato substitute, canned yams.

Kofta Close-UpSARAH’S SPINACH & YAM KOFTAS

1 (29oz) or 2 (16oz) can(s) of yams, thoroughly rinsed and drained
1/2 lb. frozen spinach (i.e. half a 1 lb. bag), thawed
2 green chilis, diced
2 tablespoons cottage cheese (optional)
1 teaspoon salt
1/2 to 1 teaspoon paprika or cayenne
1 tablespoon ground ginger
1 egg
1/4 cup plain breadcrumbs
corn flour or besan (chickpea) flour
oil

Mash the yams in a bowl with the spinach. Mix in the remaining ingredients up to and including the breadcrumbs. Form golf-sized balls (add more breadcrumbs if the mixture is too moist). Roll the balls in corn flour.

Heat oil in a small skillet or deep fryer. Fry the kofta balls, drain on a towel, serve with my Definitive Kofta Curry Sauce.

A few notes on this recipe. I indicate that the cottage cheese is optional, not because I think that one would want to omit it for any particular reason, but rather because I accidentally left it out when making my kofta balls this weekend (in fact, now I’m stuck with an enormous tub of cottage cheese and nothing to do with it). They were tasty enough without it, but cheese can only make them better, right?

Finally, a note on frying. When a cooking method akin to deep frying is called for, as in this recipe, I use a modified shallow fry. Deep frying can be such a waste of oil that I try to avoid it. For these koftas, I used my smallest skillet filled with about 1/2 to 3/4 inch of oil (i.e. about half the diameter of the kofta balls). I let the koftas fry a half at a time, rolling them around until they got done on all sides.

Pastitso

When I search for recipes online, sometimes I find things that I didn’t even know to look for. I’m often looking for intriguing twists on ordinary dishes, and while searching last week for some new revelations on the concept of lasagna, I stumbled upon a few recipes for something called Pastitso, billed by recipe posters as “Greek Lasagna.”

I was a little surprised never to have heard of this dish before. I spent many a semester in college studying Greek Orthodoxy, my main point of research in grad school was food customs in Eastern Europe, and failing all of that, from the age of twelve, I lived next door to a second generation Greek family who kept us well supplied with baklava every Christmas. How did this Pastitso come out of thin air?

Whatever confluence of circumstance led to my heretofore Pastitso-free existence, I was determined to end the trend and so tried my hand at a Pastitso recipe this weekend. Just a few words of warning… make sure you’re well stocked on butter and eggs before attempting this recipe; I cut down on the amount of both used in this recipe, but there’s still a lot. Also, I’ve broken this recipe up into stages because, while I’ve tried to simplify it as much as possible, as I am apt to do, this one requires some time, organization, and a fair number of bowls and pans.

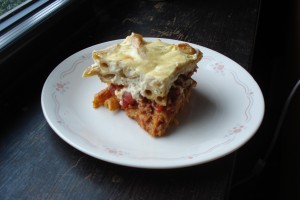
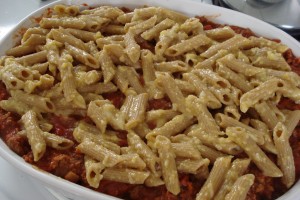
PastitsoSARAH’S PASTITSO

Stage One

4 tablespoons butter
1 medium onion, chopped
1 teaspoon minced garlic
1/4 teaspoon ground black pepper
1/2 teaspoon ground cinnamon
1/8 teaspoon ground cloves
1 1/4 lbs. ground meat
1 (16oz) can of diced tomatoes
1 (8oz) can of tomato sauce
1 teaspoon salt (optional)
water, as needed

Stage Two
1 (13oz) box of penne pasta, or other tube pasta
3 tablespoons butter
4 eggs, beaten
1/2 cup grated parmesan
1/2 cup shredded white cheese, such as mozzarella or an Italian mix

Stage Three
2 eggs, beaten
1/2 teaspoon nutmeg
1/2 cup grated parmesan cheese
1/2 teaspoon salt (optional)
dash of white pepper
4 tablespoons butter
4 tablespoons flour
2 cups milk
2 tablespoons dry sherry

STAGE ONE: Melt the butter in a skillet. Saute onions and garlic. Add the spices and saute until onions soften. Add the meat and cook until browned. Add the canned tomatoes. If the mixture is too thick, add water, otherwise if it is too liquid, simmer over a low fire until most of the liquid is evaporated. Luckily, you’ll have plenty of time to let the sauce thicken while you work on the rest of this recipe.

STAGE TWO: Prepare the pasta according to package directions (shave a few minutes off cooking time to keep it al dente, if desired). Melt the butter in a saucepan, allow to cool and meanwhile beat eggs in a large bowl. Beat the cheeses into the eggs and add drained pasta to egg mixture when done. Add melted butter. Stir together and set aside.

Top Layer of PastitsoSTAGE THREE: Beat eggs in a small bowl. Beat in cheese and spices. Melt butter in a small saucepan (such as the one used and emptied in Stage Two). Whisk flour into butter until combined; add milk slowly over medium low heat. Beat some of the warm milk mixture into the eggs, and then add the egg/cheese/milk mixture to the saucepan and heat until thickened.

Preheat oven to 350. In a large glass or ceramic casserole (9 x 13), spread half of the pasta and egg mixture over the bottom. Some pastitso recipes call for arranging the noodle tubes in rows, but this is too ambitious for me. Spread the meat mixture over the first layer of noodles, and then layer the remaining noodles over the meat. pour the white sauce over the top layer. Bake for about 25 to 40 minutes, until the top is lightly golden brown.

The end result was quite tasty, though not altogether different tasting than normal lasagna. Certainly the cinnamon and nutmeg gave it a different essence than typical Italian lasagna, and the white sauce as topping added an interesting dichotomy of color and flavor. I would recommend using the salt called for in this recipe, if you can. I made this recipe for my dad, so I omitted the salt in the actual ingredients, but ended up having to season my own portions. Unless you have to eliminate salt for health reasons, I would definitely say it’s essential.