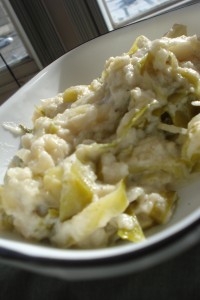
Rigatoni alla Scarmorza

My general culinary mindset over the past ten or so years has moved progressively in the direction of being lower and lower carb. Even if I don’t always use the substitutions I discover, my mind is always striving toward finding a logical and tasty low-carb substitute for foods that I eat. In recipes, even when I don’t eliminate carbs completely, I will reduce, for instance, using one tablespoon of sugar, rather than two. Some substitutions have proven to be more trouble than simply eating the carb less often-making cauliflower rice is such a to-do that I simply eat real rice, but on fewer occasions. But there is one carb for which there is no reasonable substitute; I only eat is once or twice a week on “cheat” days, but it is such a stronghold of my culinary repertoire, I simply cannot abandon it in my regular diet.

Pasta.

My relationship with pasta began with the common childhood infatuation with macaroni and cheese, but it has evolved to the point where pasta dishes are one of my strongest aptitudes in the kitchen. Somewhere along the line, I reached a threshold where I stopped ordering pasta at restaurants altogether because I could make any of my favorite pasta dishes easier and cheaper at home. The only time I eat pasta at a restaurant is when they make fresh pasta in-house; I do make my own fresh pasta at home on occasion, but it’s enough of a production to merit an appreciation of the restaurant variety.

But when it comes to any dish made with boxed store-bought pasta, my kitchen is the the only source. In part, it’s because I know every restaurant that serves boxed pasta is buying it for $1 from the same grocery store I am—that voluminous plate of pasta for $18 at your favorite mid-scale restaurant is a much bigger value-cheat than the $32 crab cakes.

More and more, however, the larger issue at hand is a particular proclivity I have developed over the years—I am an extreme al dente snob. It started when I spent a summer in college as roommates with a Mediterranean gal. It’s only grown since then. I like my boxed pasta extremely al dente. Fresh pasta is another story completely—I can enjoy a doughy fresh ravioli because it’s a completely different context. Only boxed pasta carries with it the culinary promise of al dente in the extreme.

Most pasta recipes I find online are a “no sweat” version of something I’ve tried before, or at the very least a novel re-combination of ingredients I’ve used before: “Okay, cool, so they put chicken in that…” or “…mushrooms in that…” etc. or “That’s a neat combination of spices, I’ll have to try that…”

This week, however, I ran into a recipe for a pasta dish that’s a bit apart from what I’ve tried before. It’s not so much that the methods were especially new or tricky (it’s not like we’re talking true from-scratch carbonara), but rather the ingredients were of a special caliber. At it’s heart, it’s a basic cheese-based cream sauce with stuff added. But the obtaining of the stuff was something of a challenge—many of the headlining ingredients were not available at my grocery darling, the Aldi. And many of the key ingredients were higher-brow. This was a luxury pasta dish, not an average Friday night pasta dish. That’s not to say I would pay $18 for it at a restaurant, but it presented an exciting project for my weekday grocery runs and my weekend test-kitchen.

Some ingredient notes. Scarmorza, as it turns out, is a particular type of Italian cheese that is similar to mozzarella and is often, but not always, smoked. In all the recipes I found for this dish, the smoke-flavor component was a large part of the taste-profile. Additionally, most recipes simply called for smoked mozzerella—which was hard enough to find, let alone a trip down to the Strip district in search of true scarmorza. And so, fresh smoked mozzerella is the key cheese in my recipe.

Secondly the recipe calls for peas, but I am not a fan of peas. I substitute shelled edamame for peas in most other recipes, and so I did the same here.

Lastly, the original recipes all call for prosciutto. But I feel like it’s something of a sin to bury prosciutto in a dish with so much other strong flavors, so I got pancetta cubes instead.

SARAH’S RIGATONI ALLA SCARMORZA

2 tablespoon unsalted butter
one medium onion, diced
2 cloves garlic, minced
1/2 cup dry white wine
2 tablespoons flour
2 cups half & half or heavy cream
1 teaspoon salt
1 teaspoon fresh black pepper
1/2 cup Parmigiano-Reggiano, grated
1/2 cup smoked mozzarella, grated
1/4 cup pancetta or prosciutto, diced
1/2 cup peas or shelled edamame
1/2 cup pistachio nuts, coarsely chopped
Fresh cracked black pepper
1 pound rigatoni pasta

Melt butter in a medium saucepan. Saute the onions until soft. Add the garlic. After a few minutes, deglaze with the wine. Add flour and stir until onions and garlic are coated. Add cream, salt, pepper, and cheeses. Once cheeses have melted, process with an immersion blender until smooth.

Meanwhile, cook the peas or edamame, if needed. Cook the pasta to desired done-ness. Drain the pasta and toss with sauce, peas/edamame and pancetta/proscuitto. Garnish with chopped pistachios and fresh ground pepper. Serve and enjoy!

This recipe turned out quite well, and I will likely make it again. However, I will note that it turned out well in an entirely predictable way. My pasta-with-cheese-sauce skills are pretty solid, and this dish was as good as any other that I make regularly. The extra ingredients—pistachios, pancetta, edamame—added some pleasant flavors, texture and color to the dish. But ultimately there was nothing about this dish that turned out especially amazing or surprising. It was worth the trouble of hunting down some harder-to-find ingredients, but in my opinion would not be worth $18 a plate at your local Italian eatery.
Classic Deviled Eggs

With my mom coming to visit this weekend, and a dozen eggs on the verge of its expiration date, I came to the obvious conclusion that deviled eggs would make a great low-carb snack for both of us.

I quickly realized, however, when I went to refresh my memory on my recipe for plain ol’ regular deviled eggs, that I’ve never posted it online. I’ve posted plenty of crazy fancy deviled egg recipes; I’ve made regular deviled eggs many times in the meantime… but where was that recipe? Did I use one of the fancy recipes and simplify it? Was it in a recipe book I had out from the library? Was off the cuff? From another online source?

I decided to solve this quandary once and for all by researching and composing and authoritative recipe for classic deviled eggs — plus a handy new method I’ve recently discovered for making the eggs!

SARAH’S CLASSIC DEVILED EGGS

6 large hard-boiled eggs (12 large hard-boiled eggs)
1/4 cup mayonnaise (1/2 cup mayonnaise)
2 teaspoons dijon mustard (1 heaping tablespoon dijon)
1 teaspoon lemon juice (2 teaspoons lemon juice)
few dashes of Worchestershire sauce
salt and pepper, to taste
(optional: chives or green onion in the mix, or to garnish)
paprika to garnish

Hard cook your eggs the day before and chill through overnight. Peel shells off. Slice each egg in half lengthwise.

Collect yolks in a heavier (like a zip bag) duty clear plastic storage bag. Holding the yolks through the plastic, break them up dry until finely crumbled.

Add remaining ingredients to the bag: mayo, mustard, lemon juice, Worcestershire, salt and pepper. Again, using the bag, combined the ingredients together until smooth by massaging or kneading through the bag. Press the yolk mixture into one corner using two fingers in a scissor action or by smoothing along a hard surface (think like trying to get all the contents out of a toothpaste tube). Once the ingredients are thoroughly mixed and mixture is smooth, cut a small hole in one corner of the bag and use as a pastry bag it to fill the egg halves, squeezing the contents out through the hole.

Chill. Garnish with paprika and serve.

Slow Cooker Pork Carnitas

There’s almost never a time when I’m NOT in the mood for Mexican food. This pork filling has become a staple of my cooking — and my freezer — I always have some on hand whenever I’m in the mood for Mexican. It works execellently as a filling for any taco, burrito, enchilada, etc. or a great topping for nachos. I’ve tried this recipe quite a few different times now, and have tweaked it to my liking.

SARAH’S PORK CARNITAS

3-4 lbs. pork sirloin or other boneless pork roast
2 tablespoons oil
1 tablespoon dried oregano
2 teaspoons cumin
1 tablespoon dehydrated onion or onion powder
1 or 2 jalapenos or green chilis, diced
1 tablespoon kosher salt or sea salt
black pepper, to taste
2 teaspoons minced garlic
2/3 cup orange juice concentrate

Combine oil, oregano, cumin and onion to make a rub. Coat the pork roast. Marinate for up to 24 hours ahead of time and then place in large slow-cooker.

Add other ingredients on top of whole roast: jalapenos, salt, pepper, garlic and orange juice concentrate. Cook on low for 8 hours or high for 4, or until meat falls apart. Pull the pork into shreds with fork or similar utensil (I have a bamboo cooking utensil that looks like a large “spork”).

Cook the pork a hour or so longer in its juices. Store and freeze with its juices in small containers (1 or 2 servings each) for easy access and defrosting. Before serving, fry the defrosted carnitas in a non-stick skillet in order to brown/caramelize some of the meat shreds as you reheat.

Serve with favorite fixings, such as avocado, lime juice, cheese, salsa, sour cream, etc. with taco shells

Coconut Seafood Soup

Over the last few years, I keep coming back to this soup every year for Christmas Eve supper (we do a traditionally seafood meal). It’s the only recipe I’ve made three years (maybe four?) in a row, and has become a favorite of the family.

SARAH’S COCONUT SEAFOOD SOUP

1 (14oz) can coconut milk
3 cups chicken stock
zest & juice of one lime
zest & juice of half a lemon
1 teaspoon ground ginger
2 tablespoons fish sauce
2 lbs small seafood (e.g. scallops, mussels, shrimp, crab, etc)
2 spring onions, chopped, for garnish

Combine the first five ingredients in a large saucepan and simmer. I usually like to wait until the simmering has softened up the zest and then run the immersion blender quickly through the liquid so that the strands of zest get better incorporated, for texture’s sake.

Add the seafood and simmer until cooked through. Garnish with chopped spring onions to serve.

Massaman Curry

I’ve spoken recently about the conundrum of Thai curry paste. While it seems like a good idea, in theory, to make my own, the requirement of so many specialty ingredients to make a Thai curry paste even approaching authentic makes the prospect of a homemade paste more daunting than most culinary projects. As a result, I’ve been investing in some pre-made pastes.

It started when I found a good deal online for Thai Kitchen Red Curry Paste. I was in the mood to make my recipe for Thai Pumpkin Curry, and I knew I had used this brand of red curry paste before in that recipe to good success. In searching out this paste online, however, I encountered some other brands of curry paste not available in my average grocery store. I opted for the Thai Kitchen brand for the pumpkin curry, but when I discovered a recipe I wanted to try for Asian Meatballs in Green Curry Sauce, I remembered seeing those other brands and decided to give one a try. I ordered a jar of Mae Ploy Thai Green Curry Paste to use in the recipe. I was happy with the recipe and the flavor of the curry paste and so I went looking to see what other pastes they offered.

As it turned out, Amazon offers a variety of Mae Ploy curry pastes, including massaman! I was especially excited about the massaman paste. Since my discovery of turnips and their potato-like qualities, I’ve been anxious to try a massaman curry; potatoes are a rather iconic ingredient in this curry and I was excited to substitute turnip chunks as a good stewing vegetable. I also picked up a Mae Ploy Yellow Curry Paste, though I have admittedly never had a Thai Yellow Curry, but I was intrigued and it was on sale so I decided to buy it as well. Culinary adventures with yellow curry to come. But for now, massaman!

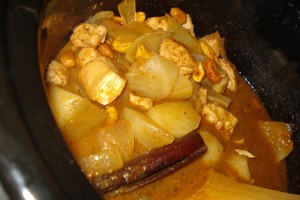
DSC02571SARAH’S MASSAMAN CURRY

2/3 cup unsalted peanuts

1 (14oz) can coconut milk
4 tbsp massaman curry paste
1-2 lbs. chicken breasts, cubed
2 lbs. turnips or potatoes, peeled and cubed
1 onion, cut in wedges
1 lime, juice and zest, or 1/4 cup lime juice
1 cinnamon stick
1/2 teaspoon cardamom
1 tsp tamarind paste (I use Tamicon concentrate)
1 tbsp brown sugar
2 tbsp fish sauce

Place the peanuts in a dry, non-stick skillet. Heat over medium-low fire, stirring often, until the peanuts are golden brown. In the alternative, place on a cookie sheet in the oven at 400. Check on and stir every five minutes until roasted. Set peanuts aside.

In a slow-cooker or large saucepan, combine coconut milk, curry paste, chicken, turnips (or potatoes), onion, and remaining ingredients. Simmer covered over low fire (for slow-cooker: 4 hours on high, or 8 hours on low) until chicken reaches desired done-ness. Toward the end of cooking, add the peanuts and heat through. Serve over rice (or cauliflower rice) and with other favorite Thai dishes.

Mexican Cauliflower “Rice”

A few months ago I embarked on my project to hone the preparation of cauliflower as a substitute for rice. My first effort in this project was the conversion of a favorite Mexican Rice recipe to a cauliflower version. It worked well enough, but since then I have accumulated further expertise in the endeavor, most significantly that keeping the cauliflower raw by any means necessary vastly improves the texture of the dish.

Being in the mood for Mexican food on a recent weekend, I wanted to go back and give this recipe another go with the know-how I have acquired from recent projects.

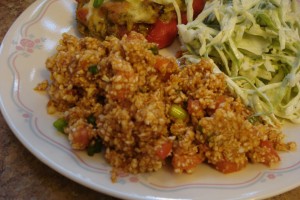
DSC02393SARAH’S MEXICAN CAULIFLOWER “RICE”

2 tablespoons oil
1 medium onion
2 teaspoons minced garlic
1 tablespoons chili powder spice blend
1 (8oz) can tomato sauce
1 bouillon cube, chicken or beef, crushed
frozen small mixed vegetables (i.e. corn, peas, diced carrots, etc.), optional

2 roma tomatoes, de-seeded and diced
5 cups cauliflower rice
green onions, sliced or snipped
1/2 teaspoon salt

Rice your cauliflower. Fold into a clean kitchen towel and set aside.

In a medium skillet, heat oil. Saute onion and garlic until softened. Add chili powder, tomato sauce and bouillon cube. Heat through. Add mixed vegetables, if using. Simmer on low fire until vegetables reach desired tenderness. Allow to cool.

In the meantime, de-seed and dice tomatoes. Combine cauliflower rice with tomatoes, green onions and salt until well-combined. Once the tomato mixture has cooled a bit, stir into the rice. Serve with your favorite Mexican dishes.

Turnip Colcannon

The discovery of turnips has opened a lot of doors for me in terms of low carb recipes. With a carb count similar to cauliflower, but a shape and texture more like a potato, the turnip is an ideal substitution in many cases. It can be spiralized into spaghetti or noodles, it can be chopped into chunks for roasting and stewing, and it can be mashed or whipped as a substitute for mashed potatoes in many recipes.

This recipe, an Irish concoction called Colcannon — basically mashed potatoes with cabbage — is one I have made in the past with potatoes. Substituting turnips turns it into a truly delicious and low-carb dish.

DSC02560SARAH’S TURNIP COLCANNON

2 lbs. turnips
2 tablespoons bacon fat, or 4 slices of bacon, chopped
1 onion, chopped
1 teaspoon minced garlic
1 lb. cabbage, finely shredded
1/2 cup sour cream
salt and pepper
green onions, sliced or snipped

Peel turnips and chop into large chunks. Boil in a large saucepan of water at least 20 to 30 minutes until the turnips are tender.

Meanwhile heat the bacon fat in a medium saucepan that you can cover. If you don’t keep bacon fat, then you can fry up 4 slices of chopped bacon. Once bacon is crisp, or fat is melted, add the chopped onion and minced garlic. Fry in the bacon fat until onion is softened. Add the shredded cabbage, stir and cover. Allow the cabbage to steam/fry with the onion, garlic and bacon fat until the cabbage is soft.

Meanwhile, drain the turnips and mash with the sour cream, salt and pepper. I like to use an immersion blender to get the turnips as smooth as possible. Once turnips are mashed, combine with the cabbage mixture in a casserole dish for heating/serving. Stir in green onions. Colcannon can be served now, or can be kept on low in the oven while other food preparation for the meal catches up. Serve with gravy, au jus, or cream sauce.

Asian Meatballs in Green Curry Sauce

I stumbled onto a green curry meatballs recipe a couple weeks ago almost purely by accident. I don’t even remember now what I was looking for when I found it — something completely unrelated — but it caught my eye immediately!

I had recently purchased red curry paste in bulk online, and so I decided it might be a good time to acquire some green curry paste, as well. Normally I’m a fan of making my own curry spice blends, but I’ve found Thai pastes to be somewhat prohibitive. They require a large number of fresh ingredients; done properly they also require specialty produce (e.g. kaffir lime leaves, lemongrass, etc) that would require a special trip outside my daily comings and goings whenever I felt like cooking Thai — which happens rather frequently. And so, I decided I should invest in some prepared curry pastes.

I made a few key adjustments to the original recipe, many to make it low carb, but also the optional introduction of a bell pepper (I happened to have one around). Here’s what I ended up with:

DSC02410SARAH’S ASIAN MEATBALLS in GREEN CURRY SAUCE

Meatballs:
1/4 - 1/3 cup breadcrumbs
1 teaspoon minced garlic
2 tablespoons green onions, white and pale green parts, snipped
2 tbsp fresh cilantro or 1 tablespoon cilantro chutney
1 tbsp sesame oil
1 tbsp Thai sweet chili sauce
1 tsp fish sauce
1 lb ground meat

Green Curry Sauce:
7 oz coconut cream
7 oz water
4 tbsp Thai green curry paste
1 cup chicken broth
2 tbsp fish sauce
zest and juice of one lime
1 tbsp brown sugar
1 bell pepper, thinly sliced (optional)
2 tbsp fresh chopped basil (optional, to garnish)

Preheat the oven to 350. Combine all the ingredients for the meatballs — except the meat — in a medium bowl and whisk together well with a fork. Allow to sit for at least 30 minutes so that the liquid ingredients can hydrate the breadcrumbs.

Meanwhile combine all the sauce ingredients in a medium saucepan. For now, do NOT add the bell pepper or basil. Bring to a gentle simmer over a low fire.

Add the meat to your bowl of meatball ingredients. Combine well. Form the meatballs and place on a large shallow casserole dish or cookie sheet. Bake in the oven for 15 to 20 minutes, until the outside of the meatballs is golden brown.

Add the meatballs to your pan of curry sauce. If you’re using some bell pepper, add slices now. Simmer until peppers are cooked and meatballs are heated through.

Serve garnished with fresh basil.

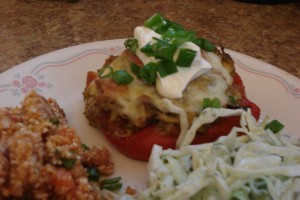
Quesadilla Stuffed Peppers

There are a few foods I can’t help but miss on a low carb diet. Pizza is one of them, and the whole complement of tortilla-based Mexican dishes. Tortillas are difficult to substitute for. Rather than force some type of low-carb ingredient into tortilla form, I’ve found it’s often better just to approach the recipe from a different angle. Having had recent success taking such an approach with a pizza-inspired recipe, I decided to do the same with Quesadillas.

DSC02390SARAH’S QUESADILLA STUFFED PEPPERS

1/4 cup oil
1/2 cup lime juice
1/2 cup chicken broth
1 teaspoon garlic, minced
1 teaspoon chili powder spice blend
3 tablespoons chopped cilantro or cilantro chutney
1lb chicken

3 bell peppers
3/4 cups taco cheese, shredded

1 (10oz) can tomatoes with green chilis, drained
8 oz monteray jack cheese
green onions
sour cream

Combine oil, lime juice, chicken broth, garlic, chili powder, cilantro and chicken in a saucepan or crockpot. Simmer until chicken is done enough to shred with a fork; this will take several hours. Keep a saucepan on low, covered, stirring often; crockpot can be set to high. Expect 3-4 hours.

Preheat oven to 400. When chicken filling is getting close to ready, cut bell peppers in half; remove seeds and stems. Place insides up on a cookie sheet or in a large, shallow casserole dish. Distribute taco cheese evenly among pepper halves. Bake at 400 for 20-30 minutes, or until cheese gets a bit golden brown. Remove from oven and set aside.

In a large bowl, combine shredded chicken, tomatoes with chilis, and 4 oz of shredded monteray jack. Distribute filling evenly throughout the peppers. Shred or slice the remainder of the monteray jack. Top the peppers with the cheese. Bake on 400 another 20 to 30 minutes until the cheese is melted and a bit golden brown.

Garnish with green onions and sour cream and serve.

Thai Red Curry Cauliflower “Rice”

I was planning to try a new green curry recipe last weekend, and I also happened to have some leftover pumpkin curry in the freezer, so a Thai feast seemed in the works. It occurred to me a rice dish was a logical addition (and, of course, for me this means cauliflower “rice”), and so I took to the Internet to research a flavorful rice dish that is uniquely Thai.

Now, cauliflower rice can be eaten plainly. The simplest preparation is riced cauliflower with some oil, salt and pepper. That’s as close as I would recommend getting to “plain” cauliflower rice. In my humblest opinion, it needs a bit more seasoning to stand on its own as a dish, and so I look for rice dishes that are complex and flavorful when I’m looking to convert a recipe to cauliflower rice. I’ve already done a few cauliflower rice recipes that complement Thai food well, such as Coconut Rice and Cilantro Lime Rice, but I wanted something more intricate this time, something that could stand on its own. I figured, my favorite Thai restaurant has all kinds of entree rice dishes, surely I could find a recipe for something like that to fit the bill

I’ve also found that cooking the cauliflower rice directly (i.e. as part of the dish preparation; warming is okay) is less than ideal, as the rice loses its texture easily and releases extra liquid into the dish. Many of the recipes I found were for fried rice; many did not seem all that much different from Chinese fried rice recipes-maybe one or two extra “Thai” ingredients. They were uninspiring, and they of course involved cooking the rice by frying it. Since I already keep a lot of integral Thai food ingredients in my cupboards (e.g. curry pastes and powders, sriracha, fish sauce, lime juice, peanuts, etc.) I decided to put together a recipe based on Thai dishes and flavor combinations I’ve enjoyed in the past.

DSC02401SARAH’S THAI RED CURRY RICE

8 cups cauliflower rice
2 tablespoons red curry paste
1/2 cup coconut cream
1/8 cup lime juice
1/8 cup soy sauce
1 tablespoon peanut butter
1/3 cup peanuts, crushed
1/3 cup unsweetened coconut flakes or powder
2 roma tomatoes, diced
1 teaspoon salt
green onions

Rice your cauliflower. Fold into a clean kitchen towel and set aside.

In a compact but tall container (I used the plastic measuring vessel that came with my immersion blender), combine curry paste, coconut cream, lime juice, soy sauce and peanut butter. Mix thoroughly into a sauce (I used my immersion blender to do so; works well to overcome the tackiness of the peanut butter).

Meanwhile crush and toast the peanuts in a dry, non-stick skillet. Once the peanuts are lightly toasted, add the coconut (it will toast faster) and stir until coconut is golden brown. Remove from heat.

In a large bowl, combine cauliflower rice, diced tomatoes, salt and green onions. Add the toasted peanuts and coconut. Once all those ingredients are well-distributed throughout the rice, add the peanut sauce and combine. Serve with your favorite Thai curries.

Note that the peanut sauce in this recipe is intended to coat the rice lightly with flavor, not to be a thick sauce to saturate it. The overall texture is a “dry” rice, rather than a soupy or saucy dish.

I was quite pleased with this recipe. And excellent complement to the curries I was making to eat alongside it. Can’t wait to have the leftovers later this week!